
Ceramic tile is a wonderfully durable choice for any home, but keeping it looking its best takes a little more than a quick wipe-down now and then. The secret to sparkling tile is actually pretty simple: stay on top of the grit and grime with regular sweeping, and give it a weekly mop using a pH-neutral cleaner. This simple routine is your best defense against the slow, sneaky buildup that can make even the most beautiful floors look dull. For example, think about the high-traffic path from your back door to the kitchen; just sweeping up crumbs and dirt daily prevents that grit from being ground into the tile's finish every time someone walks by.
Keeping Your Ceramic Tile Looking Brand New
There's a reason you see ceramic tile everywhere; it's a huge global industry valued at over USD 250 billion. For you as a homeowner, that just means your tile is an investment worth protecting. With the right care, those tiles can easily last 50 years or more, and consistent cleaning is the key to preventing common headaches like mildew and dingy grout.
This guide isn't about generic tips you've heard a thousand times. We're going to get practical and talk about real-world situations. I'll walk you through how to deal with everything from daily dirt in a busy kitchen to that stubborn soap scum that loves to build up in the shower. The goal here is to give you techniques that actually work.
Your Path to Pristine Tile
We'll cover a complete care strategy, so you'll know exactly what to do and when.
- Routine Cleaning: We'll start with the simple, effective habits that make the biggest difference day-to-day. A practical example is sweeping the kitchen floor each evening after dinner to pick up food particles before they get sticky and hard to remove.
- Deep Cleaning: Then, we’ll get into the nitty-gritty of tackling tough stains and bringing back that original shine, like removing the yellowed, greasy film on the backsplash behind your stove.
- Grout Care: And of course, we can't forget the grout—I’ll show you how to brighten those lines and keep them looking fresh. Imagine turning the dark, stained grout in your entryway back to its original light gray color.
Think of this as your go-to manual for mastering ceramic tile care, packed with insights to protect your floors and walls. For a few more expert tricks to add to your cleaning arsenal, check out these 5 amazing tips for cleaning tile.
The right cleaning methods do more than just make your tile look good; they create a healthier home. Opting for eco-friendly, biodegradable products is a huge part of this, as they’re much safer for kids, pets, and anyone with sensitivities.
This is especially critical in places like kitchens and bathrooms, where hygiene is paramount. You can dive deeper into the benefits in our guide to environmentally-friendly house cleaning. By making these small changes, you're not just cleaning—you're ensuring your tile remains a beautiful, long-lasting feature of your home.
Gathering Your Essential Tile Cleaning Toolkit
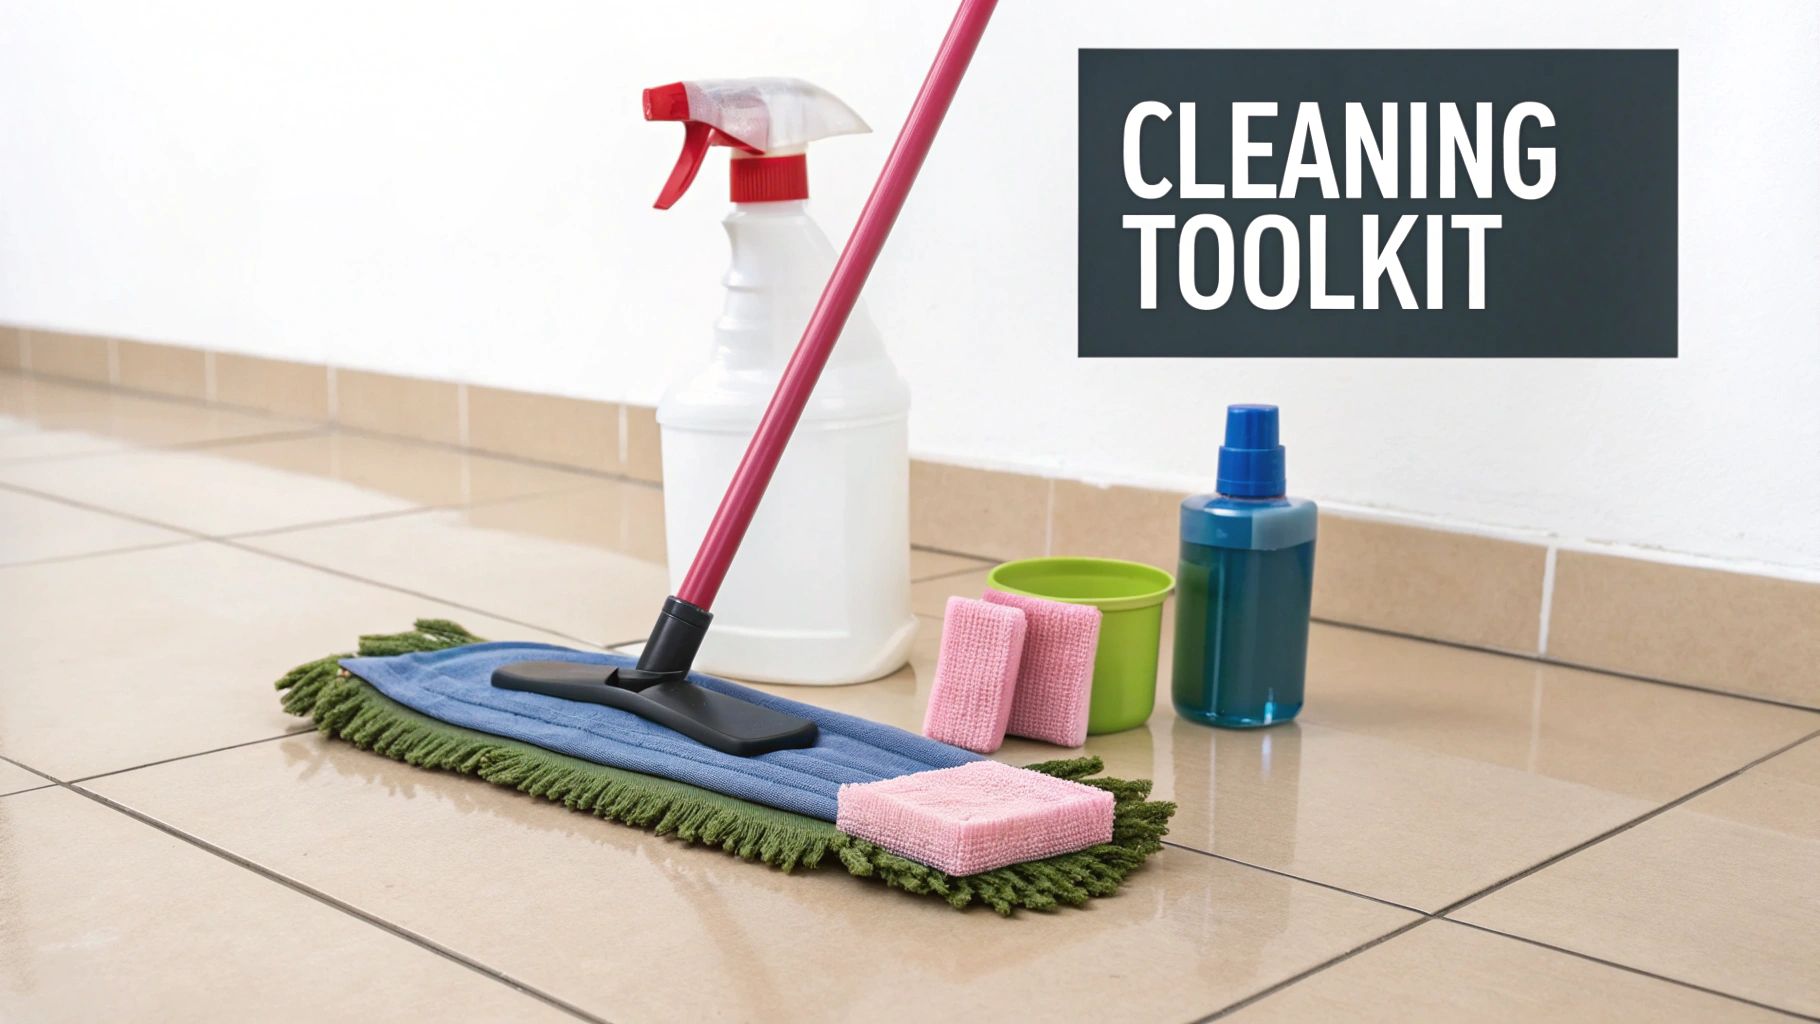
Before you can get those ceramic tiles sparkling, you need to assemble the right gear. Having everything ready to go makes the whole process faster and way less of a chore. You don't need a closet full of fancy gadgets, either—just a few reliable tools will do the trick for most jobs.
Think of these as your go-to items for daily and weekly upkeep. They’re your first line of defense against dirt, dust, and grime.
- Microfiber Mop: If you’re still using a classic string mop, it's time for an upgrade. A flat-head microfiber mop is a game-changer because its fine fibers actually trap and lift dirt instead of just pushing it around. For example, it will pick up pet hair in one pass instead of leaving behind wet clumps.
- Soft-Bristle Brush: This is your best friend for getting into grout lines. Steer clear of wire brushes, as they can easily scratch your tile or damage the grout. An old toothbrush is perfect for tight spots, like scrubbing the grout behind a faucet.
- Spray Bottle: A basic, reusable spray bottle gives you total control when applying cleaning solutions, letting you target specific spots without soaking the whole floor. This is ideal for cleaning up a small spill in the kitchen without having to mop the entire room.
Choosing Your Cleaning Solution
The cleaner you use is just as important as the tools. While there are plenty of powerful commercial cleaners out there, simple DIY solutions are often just as effective—and they're usually gentler on your tiles and safer for your home.
Here's a quick comparison of common DIY and commercial tile cleaners to help you choose the right solution for your needs.
DIY vs Store-Bought Tile Cleaner Comparison
| Cleaner Type | Best For | Pros | Cons / Cautions |
|---|---|---|---|
| Vinegar & Water (50/50) | Everyday grime, light grease, hard water spots. | Inexpensive, effective disinfectant, eco-friendly. | Acidic; can damage unsealed or colored grout over time. |
| Baking Soda Paste | Stubborn stains, scuff marks, grout cleaning. | Gentle abrasive, natural deodorizer, great for spot-treating. | Can leave a slight residue if not rinsed thoroughly. |
| Mild Dish Soap & Water | Routine floor mopping and general surface cleaning. | Safe for most surfaces, cuts through grease well. | Can leave a slippery film if too much is used. |
| pH-Neutral Commercial Cleaner | Sealed grout, delicate or high-gloss tiles, heavy-duty cleaning. | Formulated for tile safety, often no-rinse, very effective. | More expensive, may contain harsher chemicals. |
A classic homemade cleaner made from a 50/50 mix of distilled white vinegar and water is fantastic for cutting through everyday grime. Think about those little grease splatters on the kitchen backsplash after making dinner—this solution cuts right through them. Just be mindful of unsealed grout, as the acid in vinegar can slowly eat away at it.
For tougher, stuck-on messes, a simple paste of baking soda and water works wonders. Picture a sticky juice spill that’s dried onto the floor. Spreading this paste over the spot and letting it sit for a few minutes will help lift the stain without scratching your tile’s finish.
Choosing eco-friendly cleaners isn’t just about being green. It can actually extend your tile's life by up to 25% by preventing the chemical residue that dulls the finish over time.
Of course, sometimes a store-bought cleaner is the right call. If you go this route, look for a pH-neutral formula made specifically for tile. It's the safest bet for protecting delicate finishes and sealed, colored grout. For more real-world advice, you can check out some of our other house cleaning tips.
Your Simple Daily and Weekly Cleaning Routine
Keeping your ceramic tile looking brand new isn’t about spending hours on your knees scrubbing. The real secret is consistency. A little bit of daily and weekly attention prevents the kind of deep-set grime that makes you want to give up and call in the pros.
Think of it like this: every tiny piece of dirt, sand, and grit that gets tracked into your home acts like sandpaper on your floor. Under every footstep, those particles are slowly scratching and dulling the tile's protective glaze. A quick sweep or vacuum each day stops that damage before it even starts.
For instance, picture your entryway after a rainy day. Instead of letting that tracked-in mud and debris sit, just grab a vacuum with a soft brush attachment. A two-minute pass lifts away all those abrasive bits before they get ground into your beautiful tile and grout.
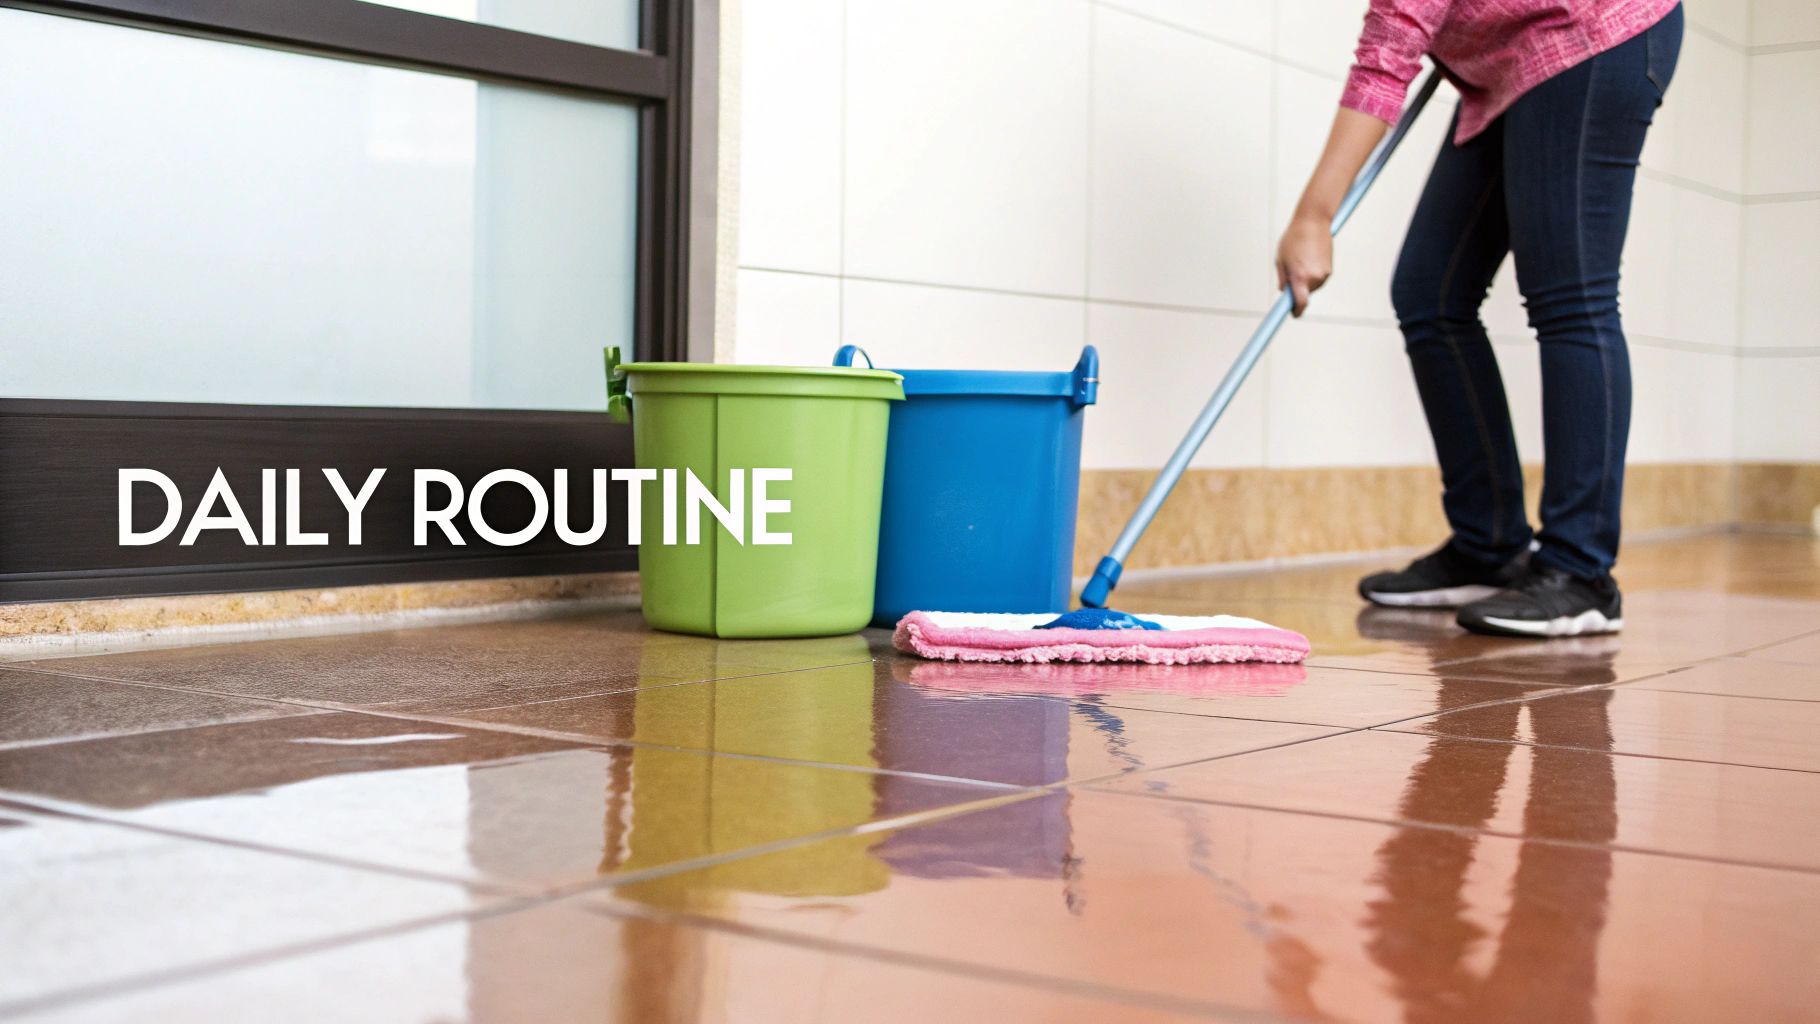
Mastering The Weekly Mop
When it's time for your weekly mop, the goal is simple: lift the dirt completely off the floor, don't just push it around. This is where the two-bucket method, a trick professionals swear by, makes all the difference.
It’s a simple but brilliant technique that ensures you're always using clean water and not just spreading grime.
- Bucket One: Fill this with your cleaning solution. For example, a gallon of warm water with two tablespoons of mild dish soap.
- Bucket Two: This one is just for clean, plain rinse water.
- The Process: Dip your mop into the cleaning solution, mop a small 4x4 foot section of the floor, and then—this is the key—rinse the dirty mop in the second bucket before you ever put it back into your cleaning solution.
This one small adjustment is a game-changer. It prevents that hazy film that often appears after mopping, which is really just a thin layer of dirty water left to dry. If you prefer a natural approach, a vinegar solution works wonders. We have a great guide on four more ways to clean your home with distilled vinegar that you might find helpful.
The durability of well-maintained tile is remarkable. Clean, properly sealed ceramic tiles can achieve a wear resistance rating (PEI) of up to 5, meaning they can withstand over 20,000 footfalls annually without showing wear.
This incredible resilience is why 82% of homeowners choose tile for high-traffic areas like kitchens and bathrooms. Because its surface isn't porous, it's a breeze to clean with simple, biodegradable solutions, which can reduce a household’s reliance on harsh chemicals by as much as 70%. You can discover more insights about the ceramic tile market on mordorintelligence.com.
Deep Cleaning Tile To Banish Stubborn Stains
Sometimes, your weekly once-over with the mop just doesn't cut it. Over time, a deep-seated layer of grime can build up, leaving your tiles looking dull and lifeless. When that happens, or when you’re facing down a stain that refuses to budge, it’s time to roll up your sleeves and go a little deeper.
This isn't a weekly chore. For most floors, a really thorough deep clean every few months is all you need. That said, you’ll probably find yourself tackling tough spots in high-traffic zones like kitchens and bathrooms a bit more often.
Targeting Specific Stains with DIY Pastes
Let’s talk about one of the most common culprits: the kitchen backsplash behind the stove. Splattered cooking grease bakes on over time, creating a sticky, yellowish film that a simple spray-and-wipe won't touch.
For a problem like this, a simple baking soda paste works wonders.
- Whip up the paste: Just mix about half a cup of baking soda with a few tablespoons of warm water. You're aiming for a thick, spreadable consistency, almost like toothpaste.
- Apply and let it sit: Smear the paste right onto the greasy tiles and grout. Now, walk away. Give it at least 15-20 minutes to work its magic and break down that stubborn grease.
- Scrub and rinse: Grab a soft-bristle brush and gently scrub the area in small circles. You’ll feel the grease starting to lift. Wipe everything down with a damp cloth and give it a final, clean rinse.
In the bathroom, the classic enemy is soap scum on shower walls. That chalky, white buildup is a stubborn mix of soap, hard water minerals, and body oils. A quick spray of white vinegar can often dissolve it without needing any harsh chemicals.
A huge part of effective cleaning is patience. Don't be afraid to let your cleaning solutions do the heavy lifting for you. Giving a paste or spray time to work means you can scrub less and still get better results.
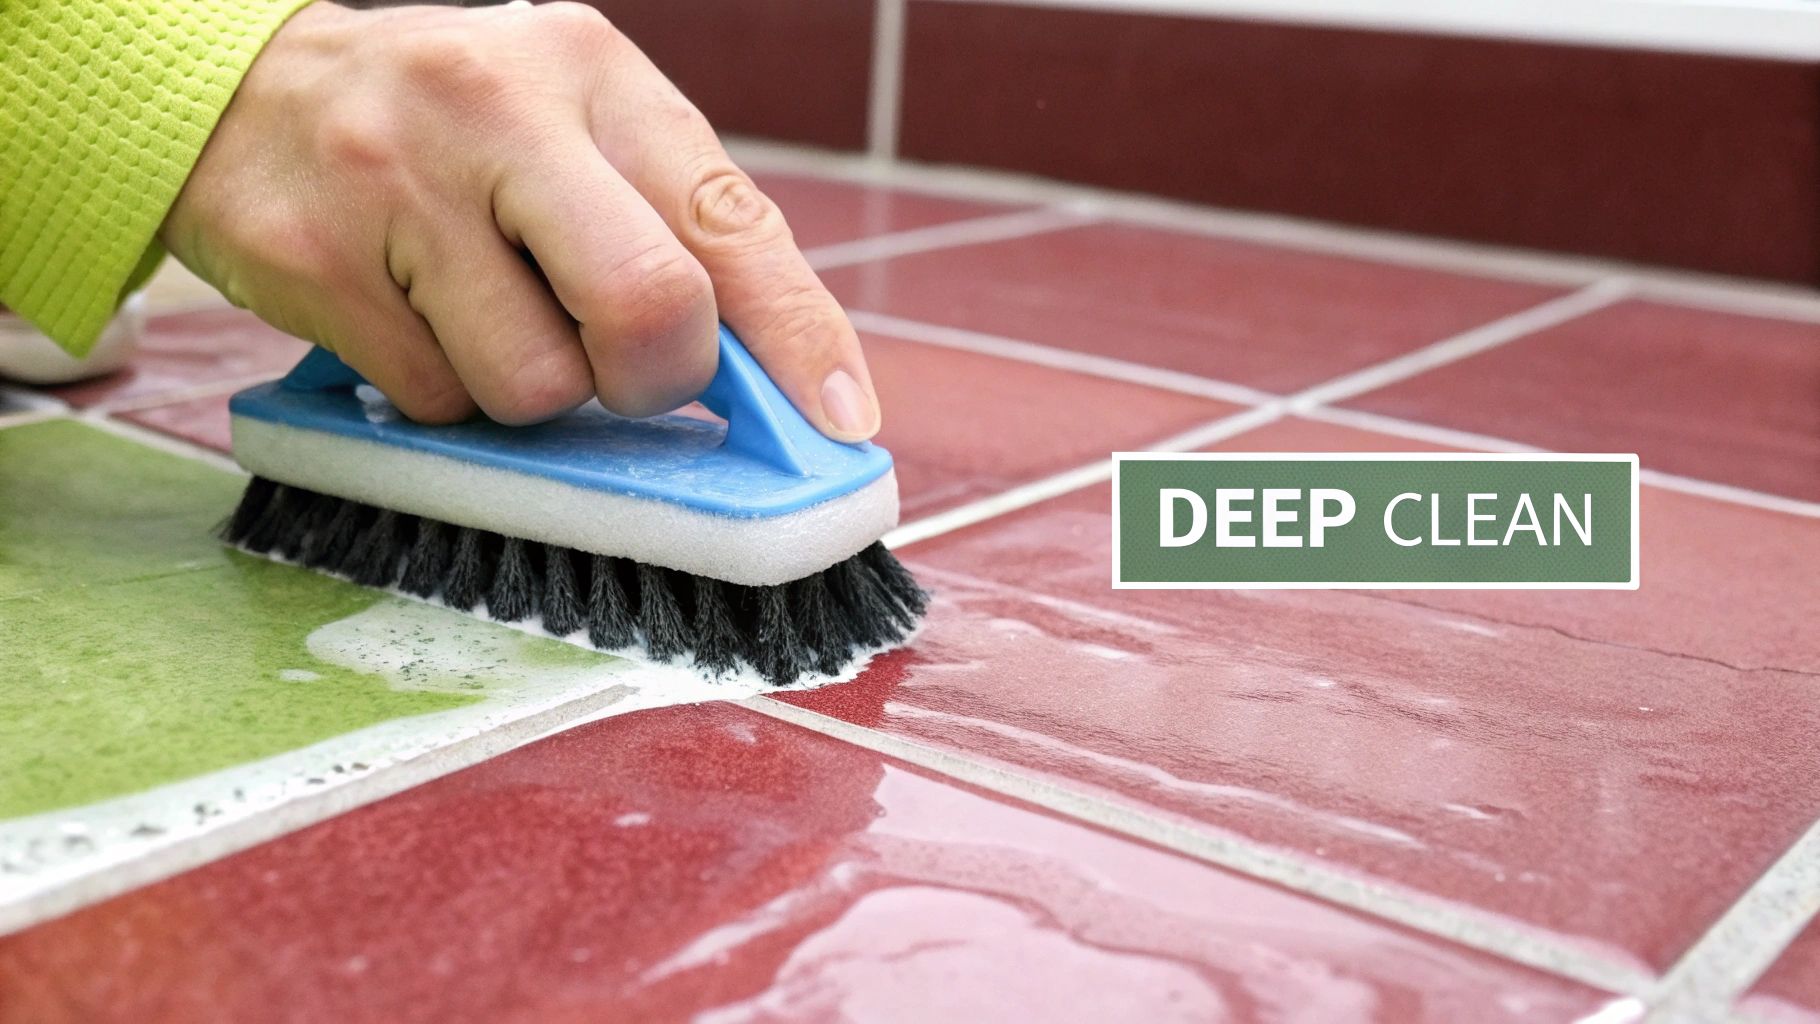
Reviving Discolored Grout
Dingy, stained grout can make even the cleanest tile look old and tired. Years of foot traffic and spills can turn crisp white lines into a grimy shade of brown. But you don't have to spend hours on your knees scrubbing for a mediocre result.
The secret weapon here is an oxygen bleach solution. Unlike harsh chlorine bleach, it's color-safe and cleans by releasing tiny oxygen bubbles that power stains right out of porous grout.
- First, mix the solution according to the product's directions, usually by dissolving the powder in hot water.
- Next, carefully pour or brush the solution directly onto the grout lines. Let it bubble away for about 10-15 minutes.
- Then, give the lines a light scrub with a dedicated grout brush (or an old toothbrush). You'll be amazed at how easily the stains lift.
- Finally, rinse the entire area with a mop and clean water to wash away any leftover cleaner and all that loosened grime.
Harnessing the Power of Steam
If you're looking for a truly powerful, chemical-free deep clean, a steam cleaner is an fantastic tool. Steam uses high-temperature vapor to sanitize surfaces, blasting away dirt that's become embedded in both the tile and the grout. It’s a great option for families with kids, pets, or allergy sufferers because it kills 99.9% of germs and bacteria with zero chemical residue.
This method is especially effective on textured tiles that have little crevices where dirt loves to hide. A quick word of caution: make sure your grout is sealed and in good shape before you start. High-pressure steam can sometimes damage old, crumbling grout.
While a good deep clean can be a satisfying DIY project, there are times when calling in a professional is the smarter move. For bigger, more overwhelming jobs, you can learn more about our additional house cleaning services and let us tackle the challenge for you.
Common Tile Cleaning Mistakes To Avoid
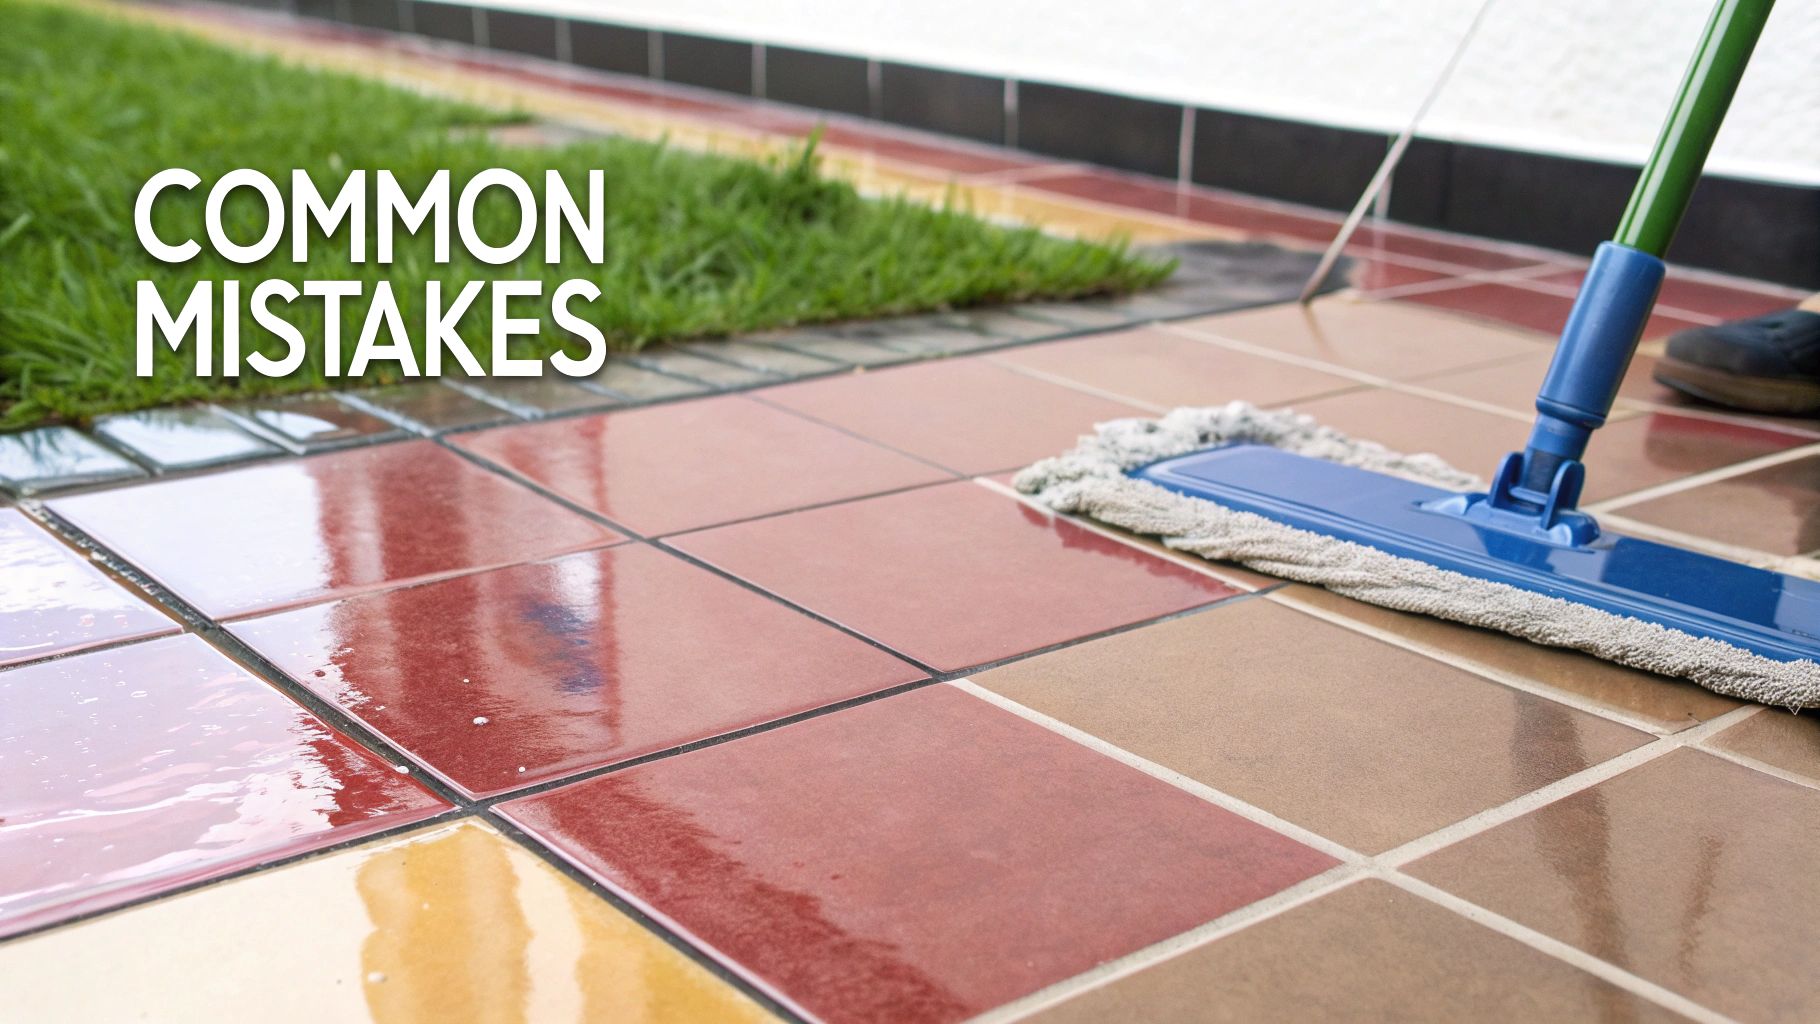
It’s surprisingly easy to do more harm than good when cleaning ceramic tile. Even with the best intentions, a few simple mistakes can leave you with dull, grimy floors—or worse, permanent damage. By steering clear of these common pitfalls, you'll not only protect your investment but also get that sparkling finish you’re after.
One of the biggest blunders I see is people grabbing the wrong cleaner. Maybe you have an oil-based wood floor cleaner handy and think, "What's the harm?" The problem is that it leaves behind a sticky residue that acts like a magnet for dust and dirt. Your floors will actually get dirty faster.
Another classic mistake is getting too aggressive with scrubbing. When faced with a stubborn scuff mark, it’s tempting to reach for something like steel wool. But that’s a one-way ticket to ruining your tile’s glaze. Once you scratch that protective surface, those tiny abrasions will trap dirt forever and create a permanently dull spot.
The Dangers of The Wrong Solution
Even popular DIY cleaners can backfire if you're not careful. For instance, while vinegar is a great natural cleaner, its acidic nature can be a real problem for your grout if the solution is too strong or used too often.
Over time, the acid in undiluted or strong vinegar solutions can break down the grout sealant and then begin to erode the grout itself. This can lead to crumbling grout and potential water damage beneath the tiles.
Finally, a major reason for a streaky, cloudy finish is just letting the floor air-dry after mopping. All you're doing is allowing a thin film of dirty water and cleaning residue to dry right back onto the surface. No wonder it looks hazy!
Here’s a quick rundown of what not to do and what to do instead:
| Common Mistake | The Damaging Outcome | The Better Way |
|---|---|---|
| Using Steel Wool | Creates permanent, fine scratches that dull the tile's finish and trap dirt. | For tough spots, use a non-abrasive scrub sponge or a soft-bristle brush with a baking soda paste. |
| Air-Drying Dirty Mop Water | Leaves behind a cloudy, streaky residue that dulls the entire floor. | After mopping, go over the floor with a clean, damp mop, then dry it immediately with a microfiber towel. |
| Applying Oil-Based Cleaners | Creates a sticky film that attracts and holds onto new dirt and dust. | Stick to a pH-neutral cleaner made for tile or a simple, properly diluted vinegar and water solution. |
When to Call in the Pros for a Tile Deep Clean
Look, keeping up with regular cleaning is the absolute best way to maintain your tile floors. But let's be honest, sometimes your best efforts just don't cut it anymore. Knowing when to wave the white flag and call for backup can save you a ton of frustration and get you a clean that home equipment simply can't deliver.
This isn’t about admitting defeat; it’s about working smarter.
Think about that high-traffic entryway where the grout has turned a dingy gray, no matter how much you scrub. Or maybe you're putting your house on the market and need those bathroom floors to sparkle for the listing photos. These are the moments when calling a professional stops being a luxury and starts being a smart, practical solution.
What a Professional Brings to the Table
A professional tile cleaning crew comes with a lot more than just some extra muscle. They have the gear and the know-how to make a real difference.
- Serious Firepower: We're talking about truck-mounted hot water extraction systems. This isn't your average steam mop. This equipment uses high pressure and heat to blast out the dirt that's been ground into the pores of your tile and deep into your grout lines for years.
- The Right Expertise: A pro can instantly identify your specific type of ceramic tile and grout. This is crucial because they'll select the exact cleaning solutions that will work wonders without causing any damage. For example, they'll know not to use an acidic cleaner on a marble threshold next to your ceramic tile.
- Proper Grout Sealing: This is a big one. After a truly deep clean, they can apply a professional-grade sealant to your grout. This creates a protective barrier that fights off future stains and makes your own daily cleaning way, way easier. Imagine spilling coffee on your freshly sealed grout; with sealant, it will bead up on the surface for you to wipe away instead of soaking in and staining.
Handing the job over to an expert isn't just about getting things cleaner. It's about restoring and protecting your investment for the long run. They have the right tools to clean ceramic tile and grout correctly, giving you a beautiful, uniform result that lasts.
At the end of the day, if you're just plain overwhelmed, you don't have a free weekend to dedicate to scrubbing floors, or you feel like you've hit a wall with your own results, it’s a great time to call in the experts. They can bring your tile back to life in just a few hours.
If you think it's time for some professional help, you can check out the different Aquastar cleaning services we offer to see what's right for your home.
Got Questions About Ceramic Tile? We've Got Answers.
Even with a solid cleaning routine, you're bound to run into a few tricky situations with your ceramic tile. Here are some of the most common questions we get from homeowners, along with our straight-to-the-point answers.
How Often Should I Really Be Deep Cleaning My Tile Floors?
For the average household, a good, thorough deep clean every 6 to 12 months will do the trick.
But let's be realistic—life happens. If you've got a busy kitchen, a mudroom that sees constant action, or kids and pets, you might need to tackle it more often. In those high-traffic spots, think about a deep clean every 3 to 4 months. The best indicator? Just look at your grout. When it starts looking dark and grimy even right after you've mopped, that's your cue.
Are Steam Mops Actually Safe for Ceramic Tile?
Absolutely! Steam mops can be a fantastic, chemical-free tool for cleaning and sanitizing sealed ceramic tile. The high heat does an amazing job of cutting through caked-on grime that regular mopping just can't handle. For example, it can melt away a sticky patch of spilled soda that a regular mop would just smear around.
The one major exception is unsealed or cracked grout. High-pressure steam can force water into those vulnerable areas, leading to serious damage underneath the tile. When in doubt, always check what your tile manufacturer recommends.
What’s the Secret to a Streak-Free Shine on Glossy Tiles?
This is the number one frustration we hear about! Streaks are almost always the result of two things: using way too much cleaning solution or letting dirty water dry on the floor.
To get that perfect, glossy finish, start by using your pH-neutral cleaner sparingly—a little goes a long way. After mopping, go over the floor one more time with just a clean mop and hot water. But here's the real game-changer: immediately dry the floor with a fresh, dry microfiber towel. It might seem like an extra step, but it’s the only way to guarantee a flawless, streak-free surface.
When you want a guaranteed-pristine clean without any of the guesswork, you can always trust the pros at Aquastar Cleaning Services, LLC. With over 25 years of hands-on experience, we know exactly how to bring your tile and grout back to life. Schedule your personalized estimate today!